Gingerbread House #1
Contents: Card Cut Outs
Complexity (1-10): 9
Glue: GLue Stick or PVA glue would be appropriate for this project
Instructions


First, Fold along the score lines on the 2 craft paper house cutouts - these will be glued together once you have added all the window/door/arch sections. the outside of the house is a sandy colour, the inside is a light grey colour.
Starting with the front of the house, glue the red square & round window panes onto the window cutouts. Glue the red door shape onto the front door, lined up with the door handle cut out. Glue the white star (with a heart cut out) on top of the red star, the red heart will show through, then glue them both onto the house above the front door.
Next, you will make the archway that goes over the front door. Fold along all the score lines to create 2 connected arches. Then glue the tab onto the opposite arch to create a 3-D archway.
To create the top of the arch, glue 5 red heart cutouts onto the craft paper strip - avoid the tabs - and 3 onto the front of the arch. Then glue one tab into the side of the archway (make sure the hearts face out), let this dry and then glue in the other side.
To complete the archway, glue it onto the front of the house so it surrounds the door. Be careful that it doesn't stop the front door from opening.
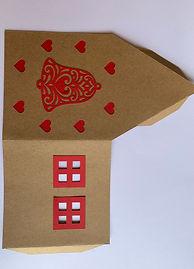
Moving onto the back of the house, glue the red piece of card (the smaller rectangle with cut-off corners) inside the back wall that has hearts cut out of it.
Turn the piece over and you should see the red hearts. Now, glue the red square window pains over the window cutouts. Lastly, glue the filigree bell onto the back wall inside the circle of red hearts.
Now that the house has all the sections attached, it's time to glue them together to form a box. Glue the side tabs together to form the main structure of the house. There are other tabs on the top that will secure the roof, which is the next section to complete.
Fold along all the score lines on the red rectangle and white roof sections (with fan shaped cut outs).
Glue the red rectangle inside the white roof section. The white section goes to the outside of the roof. You will glue this onto the house next.
Glue one set of tabs on the top of the house, and, -laying the roof down on the table red side up - place one side of the roof (with glued-up tabs) onto the roof. This technique will help you place the roof in the right place, and, give you room to get your hand inside to help secure the tabs. Let the first side dry before gluing the other tabs and rolling the house over onto the other side of the roof to complete this first Ginger Bread House section.
Overlap and glue the front and back white roof ‘icicle’ sections.
You now have the basic Gingerbread House completed.
In the next package - Gingerbread House #2 - you will add some flower boxes & greenery to the house & finish off the landscaping with a fence and trees.